An effective anti-air network will be very dependent on battlefield situations, player skill, and enemy strengths. Anti-air is a primarily defensive play and so this guide will focus on the static uses of anti-air.
Radar Guided vs Infrared
There are two primary weapon’s systems. There is a third type, but more on that later.
Radar guided systems will track a target through a laser. With that target pin pointed the munitions will be deployed against the target. This makes radar guided systems highly accurate and as well very long range.
The downside is that enemy planes can track this laser to its source. The kind of enemy weapon that does this is the SEAD fighter. These will have the tag of “Anti-Radar” in the armory and will often make radar guided systems highly vulnerable.
To trick an SEAD plane turn off your radar guided systems. They will not be able to see the radar if they can’t see it. Once an enemy plane is no longer facing forward you can turn it on and get an easy hit on them. However if they send out SEAD fights and bombers in tandem you will lose this anti-air vehicle regardless.
Infrared systems track heat signatures of their targets. Infrared systems are far less accurate and have a much lower range. Their advantage is that SEAD planes will not be able to deploy against them.
The SACLOS system (sometimes called MCLOS) is used in a few anti-air systems. It is not easy to kill like radar but it has one problem. The SACLOS system’s attacks can only hit a target it can see. Once it moves out of your vision range the missile will fizzle out and land in a random location.
Fire and Forget?
A large number of anti-air systems will have a tag on the side that reads [F&F] this stands for fire and forget.
Functionally F&F means a unit can fire more than one missile at a time. Non F&F systems will only fire a second missile once the first one hits.
Vehicles with fire and forget systems will do substantially more damage per second than those without it. However since they are launching so many missiles so fast they need to be re-supplied far more often.
MANPADS
Manpads is short for Man Portable Air Defense System… it is essentially a GI JOE with a rocket launcher on his back.
MANPADS are the only anti-air type that is safe to deploy to the front lines. When placed in a town they gain bonus damage resistance. They can and are most often deployed on mountain areas and forests.
All MANPADS carry infrared weapons. This of course means they have short range. However a plane that fires over a MANPAD is going to get hit. Helicopters are going to be very easy targets for these units. Manpads should never be grouped with your army. They are very vulnerable to artillery and napalm and anything targeting a more visible unit, will demolish them.
They are however insanely cheap and a very cost efficient and supply efficient way of anti-air.
Their biggest weakness is mobility. Once deployed they move very slowly. It means once you’ve burned through all of your anti-air missiles it will take a long time to re-supply them.
Anti-Air Artillery
In German it would be referred to as Flak. These have been deployed since World War 2 with the goal of spreading the sky with gunfire in hopes that some of these ordnance hit it.
This is still the same philosophy of the anti-air artillery. They are fast shooting weapons that are primarily used to deal with helicopters. They can deal some damage to airplanes but not nearly as much as missile based systems.
The Anti-Air Artillery, often simply called AAA, is the only anti-air system that can hit ground and air (other than the ADATS System which is niche). They do not deal terribly high amounts of damage to infantry, but in a fire fight having that extra fire power can most definitely help. However the default AI does have it preferentially fire on air units rather than ground.
One of the main problems with AAA is that they will reveal themselves for longer periods than other types. This makes them far more vulnerable to missile attacks from far more targets.
As well the AAA are radar based. This means SEAD bombers will be able to very easily destroy them if radar weapons are left on.
Much like Manpads AAA are often very cheap. Some vehicles like the Tunguska have the Anti-Air Artillery system and infrared. Many of these hybrids will require you to turn off one weapon to fire the other.
Deploying your Anti-Air Net
If you deploy too many anti-air units you will have a very weak front and be very vulnerable to tank and vehicle pushes. If you do not have enough anti-air you will become vulnerable to air attacks.
Having an effective anti-air network means mixing in cheap anti-air units with expensive ones to get the best bang for your buck.
This guide won’t be talking about air superiority fighters as that is another topic all together. But air superiority fighters can be used in an effective anti-air strategy.
Generally speaking infrared based weapons should be closer to the front. Their shorter range makes them less useful in dealing with planes however they can be used to stop helicopter skirmishing. They are also a low cost investment which means losing them is not nearly as bad as a more expensive radar guided system.
So obviously radar weapons should be at the back of your anti-air network. They cover far more ground and thus do not need to be at the front. With this setup if an SEAD bomber is moving in to try and pick off radar weapons, the infrareds can take them out.
1v1 in Wargame: Red Dragon can be punishing for those left unaware. Veterans of the game will crush newer players under their boot heel.
When you’re on a team it’s a matter of each person taking a flank and trying to dominate said flank. But with solo play you are forced to manage multiple flanks all at once.
One Flank First
It’s mostly poor map design but all of the maps have one reinforcement point. You can actually draw a straight line through each map to show the path to the reinforcement point. If your reinforcement point is lost you lose the game.
As a winning and defensive strategy you should always focus on getting to their reinforcement point before any other. If you are both doing this you will draw a line in the sand and create your first flank. If you do this and they do not, you will win. If they do this and you do not, they will win.
When two similar minded people are playing the same game they’ll both come to the conclusion that you must start the game by establishing one very powerful flank.
This flank will need to be composed of tanks, infantry, vehicles, and anti-air. Air units are quite risky early on but an iron bomb or a cluster bomb can be very successful in pinning down a newer player who is over extending into your territory.
Your goal with your first flank will also be to try and push the boundary as much as possible. Taking some early losses for a line closer to the enemy’s zone is moderately worth it.
Post-Rush Distribution
On some maps it is worthwhile to send a unit or two to the other two flanks that you will eventually have to deal with. Generally the closer your reinforcement point is to the enemy, the riskier this is.
The better the battle for the middle goes the more you should send units to other flanks to try and grab those points. In conquest grabbing extra points is how you get score. In destruction grabbing extra points will give you more revenues for more units.
Generally speaking you will want to try and post defense to an area first and then get a command to take the point.
However you also need to understand subtle hints. If the enemy posts a command on a point it means he is down 100 points worth of units. This can signal a few behaviors from you.
The first is mirror play. If your opponent can sacrifice 100 points worth of units to get a point, so can you.
Another thought might be trying to push the border a little harder. Doing this can outright win games or it can set you back.
Flanking
Each 1v1 map comes with a center (which is very important) and two other flanks that have to be managed and controlled. Each flank represents a long route to the enemy’s reinforcement point as well.
This means if you can push one flank you have a way to strike at the reinforcement line.
By doing this you can cut off all reinforcements to middle, and the other flank, and conceal the enemy.
However, your opponent will also be trying to do this exact strategy. This means that both you and your opponent will have to watch your flanks very carefully.
Bombers, rocket planes, missile planes (mmm TV guidance systems), and napalm planes are all fast and effective options to try and stop a push on all flanks.
The purpose of tank armor in battle is to attack. They are heavily mobile and equipped with large assortments of guns. When a tank column comes a specific defensive array is needed to defend against them.
These defensive arrays get the advantage because of stealth. They can get off shots. Weapons with high ranges gain a significant advantage and it becomes risky to close the gap.
Most people would simply sit on the defensive spreading their forces around a long flank.
Pushing means concentrating forces. At the head are the meat shields.
Meat shields in an aggressive action are the tanks that are best at absorbing damage allowing for your better units to trade effectively.
Part 1: The Meat
At the time of writing this the most effective meat shield is the Centurion Mark 5/I. These Aussie/Canadian tanks are superior in one major way to all other meat shields.
But looking into the future it’s important to recognize what exactly a meat shield needs to thrive.
The most important elements of a meat shield are supply, price effectiveness, armor, and strength.
The T-80U costs 150 points, has 20 front armor and 10 strength.
Front armor is how much damage is reduced by. Strength is a unit’s health.
The Milan rocket deals 17 damage.
This damage is completely negated by armor and so it will deal the minimum 1 damage per shot. In short, you have 10 shots to kill a T-80U. In practical use it rarely works out this way. More often than not crit shots will wipe out large portions of T-80U health.
So to put it in pure mathematics, a T-80U will absorb 10 shots at a cost rate of 17 points per shot.
Now let’s go down the price spectrum to the T-34/85M.
These little guys cost 10 points a piece with 3 front armor and 10 strength.
So the Milan Rocket will deal 14 damage after the negation of armor. This means the Milan Rocket will one shot every single T-34/85M that hits the field.
However now each shot is only costing 10 points per shot.
The Centurion Mark 5 is the clear winner in this particular meta because it has 10 strength and 9 armor. This means that it will take two Milan’s to kill this unit pricing it 2.5 cheaper than T-34 in absorbing power… but with better armaments.
In the future it’s entirely possible that using heavy tanks like the T-80U could become the best meat shield because of how many shots it can absorb. However with the current pricing cheaper tanks are pulling ahad.
Part 2: Use
Meat shields are not used for suicide attacks. The role of the meat shield will heavily depend on exactly what it is defending.
As an example if it is with shock troopers it will be best used to gun down enemy infantry and wipe out any vehicles that might be trying to aid enemy infantry.
If it is being used in tandem with other tanks it’s best sitting far ahead of main battle tanks so as to absorb damage.
When a meat shield takes a hit, it should be microed backwards using the reverse order. This will make it move behind your forces and allow it a chance to escape destruction. It can be re-supplied again to do this over and over and over.
Meat shields need to be spread out to avoid area of effect damage and grouped individually. If the size of the army is really big grouping in 2s is acceptable.
Step 3: How to Counter Them
And now the big question, what exactly beats this tactic.
Pretty much everything destroys these tanks because the whole point of this tank is to die cost effectively.
But it’s important to note that even when you kill this unit, you probably use. They’re being used as much as bait as they are as attacking units. If you send in enough jets to kill them eventually there will be an air superiority fighter waiting for you.
The tank destroyers are a vehicle sub-category designed entirely around killing light tanks. They are cheap, have high rates of fire.
With their high rate of fire they can kill multiple of these tanks leaving whatever they are protecting open to your higher damage weapons.
Wargame Red Dragon is composed of four single player scenarios. They vary in four difficulties and cover four different theoretical events that could have ignited a major conflict in which Cold War had gone hot. They are all small theaters of battle within a grand background war. Each scenario offers a degree of challenge.
This guide will direct you on how to beat each campaign. The first segment on Busan Pocket will detail the basics of how the campaign is played and scenarios after it will explain purely tactics and map breakdowns.
Scenario 1 – Busan Pocket
Scenario Story: Busan is one of the most Southern cities of South Korea and is a major tourist destination. South Korea has had large pockets of resistance to the existing government and as protests ramp up North Korea begins looking South. North Korea begins funding the protesters to continue to de-stablize the state. While this is happening North Korea heads south invading the remainder of the Peninsula. South Korea is unable to respond and loses all territory except for Busan and a strip of three provinces known as the Busan Pocket. America offers assistance but needs time to deploy.
The scenario is broken down into two theaters of battle. The southern front is purely defensive. You will not be allowed to leave the three provinces surrounding Busan. These three must be held.
Busan has an airport. Airports house planes. At the end of the computer’s turn the planes will move back to your airport to be re-deployed.
In your turn you can move forces to various places. Each flank is rather stable so you’ll have to deploy the same kinds of units to each flank each time. Try and set up your forces like this:
Note there is one plane in each battle. You will start with a few deployment points. You can find the deployment points in the northwest corner of the screen.
There is no point in banking your points, spend them every single chance you get. Getting a lot of planes will be very helpful early on as the enemy tends to deploy a lot of artillery initially.
After you select “End Turn” the computer will launch three attacks on each flank.
After the Computer’s Turn you will find that you will now have the option to initiate attacks on your turn. It is located on the right hand side of the overworld.
Under “Planned Attacks” will be city names in which you can initiate battles. Make sure to move your planes into position first and then initiate the battles. This will allow you to destroy more of the computer’s units faster and allow you to crush through far faster.
Map: Daegu
Daegu is the center map for the southern flank and is one of the easier ones to hold and is the single flank in which you will crush most of the computer’s offensive armies.
The map works out very simply. Bravo is where the computer will focus its forces because it is the 4 point base. The point values on the bases indicate how many points you earn every 3 seconds. The computer will almost always move towards the highest point base first.
Because of this you will need a decent amount of infantry. Place them in the towns surrounding bravo indicated by the blue lines on this map. Make sure your infantry are near road ways. The computer will run tanks, infantry, artillery, and helicopters in to try and take out your infantry, but your infantry will always trade cost effectively.
Use your planes to support them. Planes with electro-optical missiles at first will do best, but eventually cluster and napalm bombs will do well as well.
The red arrows on this map indicate YOUR attack paths. In this particular map the enemy’s command is on the Eastern tip of Geochang and can be destroyed with a small group of units or recon. The bull of your effort should be used at destroying enemy units in the center however with the command sniping being a secondary concern.
After so many losses the computer will stop attacking here so you can slowly shuffle your forces to other flanks as that happens.
Map: Uchang
This is your southern flank and it is quite tough to defend and is prone to a lot of tank rushes. It is recommend you bring an squad with a command here so that you can get more territories and more points.
This flank is very difficult to deal with and has a large cluster of lower quality tanks running into both Geochang and Delta. Note that the Daegu point is worth no points and is therefore not worth taking as long as you hold Geochang.
The red arrow represents your attack path. You rally on the left side of the river away from your forces. Once the computer begins to attack you can use tank and anti-tank vehicles to flank the enemy and go after Namgang for some easy command kills.
At Geochang and Delta you will need a lot of anti-tank weaponry and a few infantry in towns. Adding in one recon per flank will make this very very effective. If you can sacrifice it have some supply vehicles around your anti-tank vehicles in order to re-supply the vehicles as they destroy the enemy.
Only ever rally in anti-air IF the computer deploys planes or helicopters on this flank. This can all be seen pre-battle.
Map: Yeongdeok
This is one of the most difficult flanks to deal with. Busan is a 4+ point and if lost you will not be able to rally in new units. Daegu has no point value but if lost gives the computer a very quick route to flank from a bridge location.
This is purely a defensive map. There is not much opportunity for being aggressive and capturing Uijin or destroying any of the computer’s commands. The fact that you only get 4 points every 3 seconds means you won’t get many units and you will be using mostly what you have on the field.
For this map getting infantry to the blue circled town is important. It is also important to get a few infantry to the town on the left side of the map across a bridge from Busan.
K1s will be your friends here. These mega tanks will knock out a lot of units. Stage one at the blue line east of Daegu. This will pick off units as they cross the bridge. Make sure to re-supply and keep your K1s alive as they take damage. It’s important to try and setup your tank and anti-tank weapons in a flanking position. If infantry can get in the towns appropriately they will make this very easy, if they can’t it will become very hard.
This flank will not benefit from having a lot of squads which means you have to deal with smaller amounts of units.
The US Invasion
After a few turns you will gain the US fleet with some units to deploy. The carrier group is your fleet and can only be deployed in Seoul. There is no other place of value it can move to. There is only a single zone that will feature ships, and that is Seoul.
Your other units can be deployed immediately. You will find a little button on the bottom right reading “Disembark.”
Hitting this button will allow units to move from sea to land while Embark will allow them to move from Land to Sea. Disembark all of your land units and deploy your helicopters and airplanes. Note the airplanes will always return to the carrier group at the end of the Computer’s Turn.
A new set of American units can now be deployed on to this flank from the ocean. Once you capture Seoul they can be deployed directly into Seoul. You will have to balance your units for the offensive in the north with units for the defensive to the south.
Map: Seoul
This is the only map featuring a naval zone. It is insanely easy to do because of how powerful all of the ships are. Even with this it will be important to deploy a lot of marines and tanks to take the land.
Missing from this map is a single zone to the east that the computer can attack from later on… but won’t be very important and won’t be attacked in this campaign.
From left to right are three red arrows. The leftest is where you should stage your Oliver Hazard Perry ships. The second red arrow is where you deploy your infantry and tanks. The final red arrow is where you deploy your riverline boats, a flanking position.
All of the ships trade very cost effectively.
Make sure to get out at least two Oliver Hazard Perrys. They will deal with the majority of the computer’s initial forces. They will also make this all ridiculously easy.
You will also want a few Chongju’s. The stun from rocket artillery as well as the morale and regular damage will be incredible. Because of the short time frame in the game you can spam this rocket artillery nonstop.
Make sure to max out on STRB90H. These are a riverline boat and will crush tanks and anti-tank weapons with ease. They only have three hit points so withdraw and repair them if they get low.
Finally make sure to get small pockets of infantry and some tanks for cruising the land.
Once you’ve landed clear out the enemy and capture Bravo.
On the next round you will be able to deploy on Bravo and have a purely land based invasion with tanks, infantry, and riverline boats.
After two rounds of this you should capture the point. Remember to bring some recon and push north. Once north you can push east and then south very easily. The computer does not maintain a very large army to defend Seoul during this attack.
Once you have captured Seoul do not advance. Sit in this position and defend a tank push from the North of Seoul. It will be very easy to defend, but if you get caught off guard, you will lose Seoul as a reinforcement zone and you will not be able to advance into the middle zone. The game will literally not let you retreat or attack with any forces you move into that zone if there is no point to retreat or deploy from.
Note how every map has names of the provinces on them, these are all the territories that you or the computer control. The military alphabet names (like Alpha and Bravo) are ones that can swing in between the turns.
Map: Cheorwon
This map has a lot of points but is very linear. There are few opportunities for flanks and the computer will only deploy along a very linear path objective. The computer will always go for the highest point base.
Note that Seoul has no point value. It means you will need to grab either Sandang for 2 points or Pyonggang for 4 points. Sandang is a much easier point to hit because of how open it is and how many infantry you can delpoy there. Pyonggang is far more threatening. Both are opportune targets and so it’s actually worth splitting up your forces to go for both.
Try and make Sandang a larger approach. With Pyonggang you can deploy infantry along the mountain side and through the forest to gain a flanking position. Once you can secure one of these points move the command to the new base as they are both reinforcement points.
It may take two rounds to win this point. Once Sangdang or Pyongyang are captured it becomes a simply game of cleaving through with tanks. If the enemy deploys a helicopter cavalry squad make sure to stack a lot of anti-air. These can be selected in the overworld in Seoul and immediately moved to the point to contend with it.
Map: Sokcho
This final point the enemy will reinforce with whatever it has left. If you haven’t been trading well in the south…. restart. You need to wipe out armies in the south or else the computer will just rally them all north and crush you. The computer will also rally fresh armies from the north to this point. It will be very difficult to capture.
Because of this attacking will be very hard. The only point of value is Delta. There is a town north of Cheorwon that you should deploy infantry to. However the main attack route for the computer will be along the red arrow.
Deploy tanks and anti-tank weapons along that path to try and cut off any enemy forces. The whole goal of this entire mission is to capture Delta. In your first round you should just try and eliminate enemy forces. In your second round you should bring an extra command to eventually capture Delta.
The computer will never attack along the southern flank and will only ever deploy from Kosong.
If you can score a minor victory (trading semi-effectively) you win the entire scenario.
Scenario 2 – Bear vs Dragon
Scenario Story: Russia invades Vietnam having a falling out with the local government. China having a longterm agreement with both countries stays on the fence as the war begins. But Chinese intelligence discovers that Russia is making contingent plans to invade China if its opinion were to sway. China denounces the Russian aggression in Vietnam and begins to mobilize its forces. The goal of this campaign is to wipe out the Russian Pacific threat before they can mobilize against China. China colludes with their allies the North Koreans in order to orchestrate this attack.
This attack is far more complicated than Busan Pocket. At first sight it is a linear attack from east to west, but upon closer observation you find there are in fact three flanks that need advancing.
Overworld Tactics
In the overworld there is a land battle and a sea battle to fight.
You will need to deploy your ships into Bravo and secure this sector as your reinforcement route for North Korean units. North Korean units take longer to deploy but are cheaper.
Capturing Vladivostok allows you to deploy five new squads.
The arrow to the northwest allows you to capture one airport. There is an artificial wall between it and the arrow to the east. It can be passed over by a helicopter but not by any other land unit.
The second arrow is the more important one. Eventually a line of tanks and a helicopter will push through here. You will have to defend this in order to hold the viral port of Vladivostok. It will also allow you to capture an airport in which you can move your airplanes to to push forward.
The final flank is the final push. This is against a legion of mean tanks like T-80s and T-72s.
Missing from the map is a naval deployment zone in which you will have to defeat the enemy fleet.
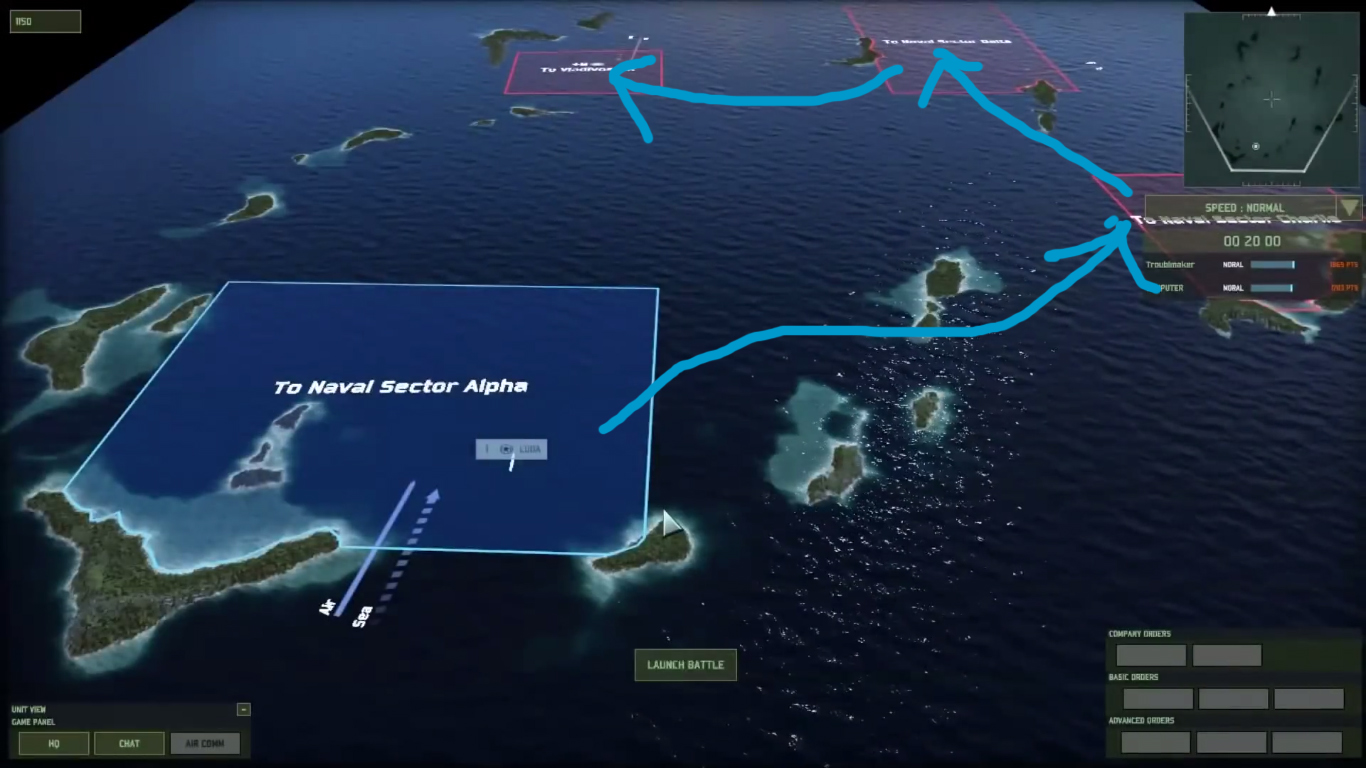
Map: Naval Sector Bravo
Relevant Videos:
This may be the only sea battle you fight. There are other naval sectors but generally the computer’s navy will not engage you as it is pathetically small. You will start off with two naval fleets and some sea bombers which you should make sure to rally in before starting the battle.
For this battle make sure to get a few Ludas and then max out on Moskits. Moskits have SEA defense which will allow them to deflect enemy shots as well as rockets of their own. You should also mix in a single MUNA for re-supplying. Since the computer has stretched his forces across three points you can presume there will be very few at each.
As you move your fleet make sure to keep one Luda at Alpha. All new points should be spent on planes so you don’t have to wait for reinforcements to come in.
Attack with your boats trying to focus down supply ships and capitol ships first. After that focus on weaker Nanchuka ships and you will capture the points.
It’s important to target the eastern base first and then move north. Doing otherwise will be problematic. The AI’s navy has a much higher range than yours so you will greatly benefit from the cover the islands will give you in order to get into range.
Map: Vladivostok
Relevant Videos:
This is your first primary objective, and it’s quite easy to get. You can Disembark a Korean Marine squad and them Embark them on to the point. It can be captured before your main force ever arrives. It is also the only point on the map that has a harbor meaning you will be able to use ships on this map. This ends up being a pretty easy map, but keep in mind it will get much harder later on.
You will want to land with tanks, that is your Chroma-Ho. And you will also want to land with infantry, that is your Jeongadae.
To support them rally in two large ships, Najins, some Shangais and some Chengu for artillery support. With these powerful ships you will be able to scour the coast of units and allow for a successful amphibious landing.
The Shangai are riverline boats which means they will be able to travel almost anywhere on the map. The Chengu are rocket artillery with an insanely high range, spam them at all costs.
Send your navy to wipe out the coast, make a naval landing and use your tanks and infantry to clean out the rest. In one turn you should be able to get out another command and capture at least one point. The point to the north is full of areas for your infantry to jump in and deal very high damage.
Chroma-Hos can move around the map pretty freely as there are very few threats to them. Focus on getting rid of commands in order to neuter the battle group.
Map: Kravtsovka
Relevant Videos:
This can either be your first or third battle depending on how you go about it. You can delay this by one turn or rush in with a non-optimal army. I’d highly recommend rushing in with a non-optimal army.
This will be largely a defensive battle. You will gain IFVs (Infantry Fighting Vehicles) that are very tank like. You can deploy infantry along the mountain near Delta. Have them walk across and move into the town. Your IFVs can be positioned in the blue lines with some recon to pick off any units coming.
In your first turn here you simply need to trade insanely cost effectively. Once you can reinforce with more units you can push into Charlie and Vladivostok to finish off the computer. Recon units will be insanely effective as the computer has very little in the way of optics.
Bringing in tanks will allow you to blaze through this point and take it very quickly.
Map: Dongning
Relevant Videos:
This point you may only fight for once. It’s an airport tile which means you can rally planes from here. It’s also worth noting that you can refit units in airports (and harbors).
This is a pretty challenging battle. You will face light tanks… a lot of light tanks. Unfortunately you won’t have a lot of your own. You will only have reservists and IFVs to help fight. Your goal should be to try and setup your IFVs in the first fight into flanks.
They have a very long range so take advantage of that wherever you can.
After your first engagement make sure to get more units towards this area and start pushing north. The T-34s are very lightly armored with weak shots. They can tear your IFVs and infantry in two, but against real tanks they are rather lacking.
Map: Ussurysk
Relevant Videos:
This point can be very challenging because of the high number of T-64s and the very long range of the battles.
You should have Korshun infantry fighting vehicles for this. They have a very long range and will give you infantry. Your infantry will unfortunately mostly be useless. Try and get them to a town if you can but they might do the best in a forest.
Your goal is to take the enemy head on trying to use your range to beat the enemy back.
One big problem you will run into is very Korshun you lose will be an infantry lost as well. So you will need to make sure to do a lot of damage if you hope to take this point. Make sure to rally away empty or weak Korshuns and bring in some supplies to bring them back to full strength.
Remember every single Korshun that you lose is also an infantry squad you lose.
Map: Spassik Dalny
Relevant Videos:
There will only be one battle in Spassik Dalny. It’s a very linear map and the computer will not have a lot of units available to fight you off.
The computer will have mostly tank platoons here. Helos will be very powerful here as will infantry and anti-tank vehicles like the Korshun. The blue lines indicate defensive lines. Make sure they are covered from attack.
Since the computer will have very little in the way of commands and units you will be able to proceed into the reinforcement zone. Make sure it is slow and steady. There are a lot of towns to use and abuse here.
Map: Bolshol Kamen
Relevant Videos:
This is a map you will either see a lot, or very little.
It has tonnes of towns and very little cover. This means you will want to deploy as many infantry as possible, a lot of anti-tank helicopter, bombers, and some anti-tank vehicles. This is an absolutely perfect map for taking out T-80s and T-80As.
So whenever you get a chance to do this map, do it. It is worth engaging as often as you can because of how bad it is for the enemy’s tanks.
The blue lines indicate lines of defense. Cover them with anti-tank weaponry, anti-air weaponry, and helos.
Because you are dealing with T-80s and T-80As en masse it will be very difficult to hold these points. Don’t fret if you lose them, simply move your line back further and further. Pushing against T-80As and T-80s is rather silly.
Map: Nakhodka
Relevant Videos:
This is one of the major points of the game. You will spend several turns on this point because of how hard it is to capture. The enemy will send a massive tank column of T-80s and T-72s down this route as well as IL-102, SU-25, MiG-29 and a few other planes.
This is a very challenging flank. The blue lines denote defensive zones as you will be playing this entirely from a defensive position. Since there are so many T-80s to deal with it will be a constant losing battle. You need to cut down the numbers of bombers and T-80s and the rest will be cake. But having said that getting rid of the T-80s is very very hard.
Try to position your units at various points to cover various angles. Infantry should be placed in towns wherever possible. Helicopters can and should be used to destroy tanks. However if you deploy helos you should also get an FOB for convenient re-supplying.
You can spend up to 10 turns on this map, so get used to seeing it. If you have to Retreat. It is worth losing some morale rather than having a very bad trade.
In fact once you win this zone… you’ve won. The final zone is very easy to beat and by that point the computer will not have enough units to actually stop you.
Map: Kavalerovo
On this final map there isn’t too much to do. Most of the major battles were fought in the past. There should only be a few tanks and a few support units.
The final push is an easy one. Use IFVs, tanks, and anything else you have left to get this final point. There won’t be much opposition and there shouldn’t be a lot of commands. Keep pushing comrad this scenario is over!
Scenario 3 – Pearl of the Orient
Scenario Story: Margaret Thatcher has won a major war to hold the Falk Islands. For decades Britain has held the lease on the island of Hong Kong and wishes to have it once more. The Chinese however wish to re-claim all of their islands and unite China into one. The British and Chinese both shuffle more forces near Hong Kong until finally the act of aggression comes. As England you have to defend Hong Kong from the Chinese at all costs.
Overworld Tactics
This overworld is far less linear than previous ones. You will immediately note that the computer has two different naval zones which in turn means the computer can draw a navy from either place. However your actual navy count for this map is quite low meaning that all naval battles have to be super efficient. On top of that you are at risk of two-prong attacking in which a second naval point can spawn a landing party to take your cities from the rear.
The frontline is far less complicated, two zones to defend with three possible zones to get units from.
The computer will eventually do a naval landing on two ocean flanks. One can be slowed down by using your navy, the other has to be engaged in a landing. The computer will be drawn to stopping you from getting your secondary objectives, protect them when the threat appears.
In order to score the Major victory you will need to split up your navy. The battlegroup with sea helicopters should go to the east and the other should go to the west. It makes the victory a lot harder, but you get the major victory.
The whole campaign can be fought from just four bases and a few naval sectors. Many of these are recycled from previous campaigns.
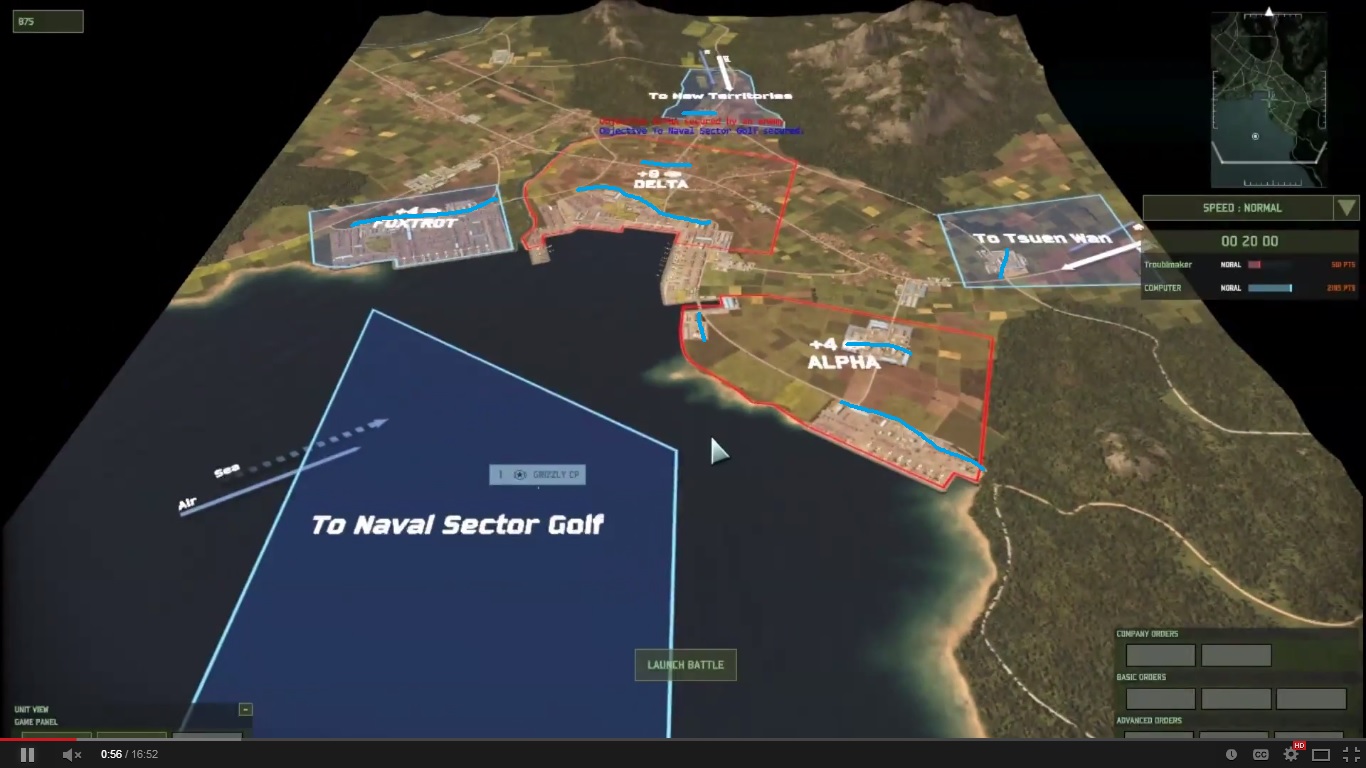
Map: New Territories
Relevant Videos:
This is one of the two flanks you will have to hold for nine turns. It is the harder of the two and over time you will lose forces without being able to actually add many new forces to it.
Note that there are three points giving bases, Bravo, Echo, and Tsuen Wan. For this reason it’s only worth grabbing those three points. The other two points can be fall back points for your commands in case you are over run. You can pull back commands to Lantau Islands and North. Once you re-grab those locations you can rally in reinforcements to deal with the enemy’s lines.
Since Tsuen Wan is your only reinfocement point this is where you will be deploying your forces from. If the enemy doesn’t attack Tsuen Wan you can rally in tanks to attack northwest to support Echo.
For this reason you will also want the majority of your forces in Echo and Bravo. Artillery and bombers are going to be very powerful on this particular map.
Get used to fighting this battle. The computer will be relentless and you will eventually be dealing with a computer with under 500 morale per shift. This map becomes very easy very quickly, but will always require a lot of battlegroups.
Map: North Districts
Relevant Videos:
This is the second flank that has to be held. If you don’t hold these two flanks you lose the secondary objective. This one requires far less battlegroups to hold, but you should place your anti-tank coy here. Anti-tank infantry and anti-tank vehicles are very important here because of the large open spaces.
The blue arrow indicates your opening attack path. Note that once you grab New Territories in the first battle you will have it for subsequent battles.
For the first engagement use tanks and infantry to jump into New Territories, get a command in place as soon as humanly possible. By doing this you are turning the map drastically in your favor.
After this using anti-tank infantry and anti-tank vehicles will be invaluable because the computer has… an infinite supply of tanks. Anti-tank helicopters will also be insanely useful.
The goal of this map is to try and survive forever. There is little point in trying to wipe out commands because they are also seemingly in infinite supply.
getting a FOB on this map will also be invaluable. Replacing those missiles will be expensive.
Map: Lantau Islands
Relevant Videos:
This map is a little weird. If you split up your fleet and go the hard way you can avoid this battle altogether. If you decide to go the easier route you will have to fight it. The first battle will be against a helicopter battlegroup and the other ones will be a naval landing.
With the helicopter group you will need to stage a lot of anti-air units. Having an anti-air plane brought in will significantly help in destroying this battlegroup. With this battlegroup you can destroy a lot with very little.
The second battlegroup is a little harder. It will have a lot of ships, infantry, and tanks. The diagram above indicates where to stage your infantry and vehicles.
The goal is to not be in line of sight of the ships so that the ships cannot actually get involved in the main battle. The actual numbers of units the enemy can deploy on land is rather low. The computer will continue to rally out large ships but will never actually deploy Riverline boats (other than landing crafts).
Map: Kowloon
Relevant Videos:
Much like Lantau this is one in which staying away from the coast will give you a lot of benefits.
In this particular battle you should deploy along the coast, tanks and anti-tank weaponry will be invaluable because of the large distances between the landing zones of the coast and the coast itself.
Deploying artillery will help destroy the LUDAs.You can use Harriers to wipe out the landing crafts. Every time a landing craft dies the unit it is connected with will not be available in the next battle. The landing crafts are also anti-air vehicles so make sure to use a lot of planes in tandem with each other.
Map: Naval
Relevant Videos:
All naval sectors are handled the exact same way… the Blufor way. In the past naval sectors were dominated by having big bad ships whipping fewer weaker ones.
The Blufor way involves mass helicopters and sea planes. You can use islands to re-supply the helicopters by pressing the “Land” button while over an island. Put a supply ship near them and re-supply.
Try to focus on command ships because if you kill the command ships, the fleet is destroyed. Moskits will be annoying because they can soak a lot of damage without getting a lot of reward.
Ships should be deployed only for the defense of the fleet. Focus on the ships with DEF so to mutually defend them against Anti-Ship Planes and enemy anti-ship missiles from ships.
Ending
On Turn 9 you will strike a Minor Victory is you hold Hong Kong, and a Major victory if you hold all Secondary Objectives.
Scenario 4 – Climb Mount Narodnaia
Scenario Story: At the end of World War 2 Japan and Russia maintain some tensions as they are unable to resolve border disputes. Although no formal war breaks out, no formal peace treaty is signed. Tensions grow as the United States deploys weapons in Japan to defend Japan from a potential Soviet invasion. As Japanese planes begin to get closer and closer to Vlavivostok the code word “Climb Mount Narodnaia” is sent across Soviet air space. This signals an invasion plan for Japan. With forces successfully landing in Osaka and many coming around the flanks… Japan is in trouble.
Overworld Tactics
The final goal of this scenario is to control three of the five airports. In other scenarios you always had far too units to send out and gained far too many points. In this one you have in the vicinity of 30 possible battlegroups with more being added as you move through the scenario.
You will start off with Osaka as your only base in which you can create troops from. You will also gain a aircraft carrier which can land troops as well as the option to land a second aircraft carrier on a different flank for a third spot to engage forces from.
Japan is composed of three islands of which controlling any two islands will give you the victory condition.
After four turns the Americans will begin deploying from Japanese bases and the South Koreans will deploy from a western fleet.
There is one zone on the southeastern island that you will never have to engage. It’s the naval port and the units here basically wil never leave this location, even when there are easy sectors to capture. This zone can be completely ignored. The rest of this walkthrough will go through the individual tactics and battlegroup types for each map.
Map: Gobo
Related Videos
You will only face this battle once. Deploy a helicopter division here, nothing on this base can shoot up.
Remember that if you lose infantry units you lose their helicopter counter part, and vice-versa. You will want to lose nothing at all in this battle. It will simply be free vetting.
Have your fleet of helicopters head north to wipe out some forces first. Then head south. You will want to destroy as many units as possible just to increase the veterancy of the helicopters for future battles.
Map: Masuda
Related Videos
Masuda is an odd map. It’s a naval landing map but you can never have control of the sea or gain any sea units. You have two airborne units on the map, bring them to Masuda for a landing. The airborne landing places you flat in the middle.
Your first instinct is to push outward, however this is a map in which you will want to turtle up with a lot of infantry and anti-tank weapons.
You can slowly push into Yamaguchi with a few infantry as the computer will have little to no forces here. However your main focus will be on defending Dmitri and keeping it alive.
Moving commands around this map is very dangerous.
Map: Marugame
Related Videos
Move your helicopter from Gobo to Marugame. Helicopters are amazing for island hoping so keeping these guys alive is vital. This is also another battle in which the computer has no anti-air. So take your time and kill every single unit you can. You will want to destroy this battlegroup completely.
Map: Iyo
Related Videos
This is going to be another one. You will need to deploy another helicopter battlegroup to win this. You will be facing off against a computer with insanely high morale and insanely high numbers of armies.
With your two start points you can split up your helicopters in half and attack multiple targets at once.
The computer can move a single anti-air unit to this, it’s a recon helicopter. If this is the case you will need to kill it with infantry or catch it on the ground. A lot of the time the computer simply turns off his weapons and you can kill the helo easily. However make sure to spread out your helicopters to avoid risk.
Note the weird mountain type on this map. These provide line of sight for the enemy to hide under. This map will get played again and again as a constant place the computer will attack from.
Always make sure to look at what units the computer is sending. They’ll rarely send in actual anti-air units but when they do, you need to find a way to kill these things quickly before they decimate your helicopter numbers.
Map: Obama
Related Videos
Move your two battlegroups from Osaka to Obama as soon as you clear out Gobo.
These battlegroups have the precious BMP-2. This is the best IFV in the game. It has a cannon that can wipe out vehicles and anti-tank missiles…. an IFV that can handle all situations.
Setup the town in front of Osaka with infantry. Align the woods behind it with the BMP 2s to fire rockets at anything that comes.
Constantly re-supply the BMP-2s with more and more resources.
You should also have some Tunguskas to help take out enemy planes. Fun Tunguska fact, it has an anti-air artillery gun (AAA) and an infrared missile system. However… it can’t fire both at once. Turn off the anti-air artillery gun until you run out of infrared missiles.
Once you have cleaned out a lot of the enemy’s rush you can move across the map with your BMP-2 army and wipe out some very easy commands. The computer has insanely high morale but doesn’t actually have enough units to fulfill it.
Map: Tsuyama
Related Videos
This is another one of these battles you will only fight once. Notice how the computer has no anti-air on this particular area. Those super mobile helicopter coys will be very effective here. Move one in.
You will start off with two zones. Deploy an equal number of helicopters on each flank. One will head west and the other will head northwest. The goal is to first cut off any units heading towards your base, and then to kill off commands. The more battlegroups you can kill here the better. Killing off commands will completely destroy battlegroups.
This is insanely easy and represents a great chance to get helicopters vetenacy for future battles.
Map: Totori
Related Videos
This is another exceptionally easy map. The computer doesn’t seem to field a lot of units, so just keep pushing west until you kill the command.
Map: Tsuyama
Related Videos
This is another one of these battles you will only fight once. Notice how the computer has no anti-air on this particular area. Those super mobile helicopter coys will be very effective here. Move one in.
You will start off with two zones. Deploy an equal number of helicopters on each flank. One will head west and the other will head northwest. The goal is to first cut off any units heading towards your base, and then to kill off commands. The more battlegroups you can kill here the better. Killing off commands will completely destroy battlegroups.
This is insanely easy and represents a great chance to get helicopters vetenacy for future battles.
Map: Yamaguchi
Related Videos
Make sure to have the southern flank of your base heavily defended with line infantry and anti-tank infantry. Having some spotters will definitely not hurt.
You will get the BMP-3 which is the best IFV in the game. You can use these by themselves to clear through Center and Hiroshima. Rallying in commands at closer reinforcement points will help you clear your way all the way to the enemy’s base.
The map is full of little towns so there are tonnes of places for infantry to be very effective.
Map: Hiroshima
Related Videos
Ah the world famous Hiroshima. Famous for being bombed by the Americans, and now famous for being conquered by the Russians I guess.
Send in your helicopter platoon to take care of this. They severely lack in anti-air here so you will be able to clean up all of these divions with relative ease.
Spawn an extra command. Move your army of helos to the east to clear out any possible remnants of resistance, and then head west to wipe out the enemy.
Keep at decently high range. You can turn off rocket pods if you choose but when enemy units clump up they will do a lot of damage.
Map: Nagasaki
Related Videos
And then there was Nagasaki. Hit this place with an amphibious unit. A proper amphibious unit should have some ships in it.
The tactic here will be attrition. Use your high powered ships to wipe out the enemy. The Shmel artillery unit will be amazing for this level. Rally out a max number of those and spam them all along the map.
You can choose to make a naval landing to the south and move along the forested area to create a new defensive line.
Eventually you will want to grab Katasu so that you can rally out actual ground forces. But take this one slow. It may take a few turns before you can capture this one.
The high powered ships will knock the enemy into the stone age and their battlegroups will fall apart very quickly.
Map: Karatsu
Related Videos
At first look you would assume that ships are really strong on this map, they’re not. You should still get some out, but mostly the Shmels.
Infantry are very powerful on this map. Do a naval landing on the east of Dmitri and deploy them to whichever towns you can get.
Once they get into the towns they can leap frog via right clicking on the adjacent town all the way to the enemy’s base. Once in they can wipe out the command. It’s also worth while doing a very limited landing at Anna.
Supplies will be a huge problem here so units like anti-tank weapons should move back once they’re out of ammunition.
Map: Oita
Related Videos
Oita is a zone with a lot of enemy units in it. It borders the actual objective. For this reason it is important to keep this base occupied later in the game as opposed to trying to capture it. Play primarily defensively. If you have infantry place them in towns. If you have AT hide them in cover. There is little to no benefit to actually being aggressive here.
You will note you have no reinforcement zone to start, this means whatever you rally in will have to be sufficient. If you are relying on a lot of rockets make sure to have some supply trucks out to help keep your men firing and being cost effective.
Map: Kanoya
Related Videos
If you’ve been counting this is the final airport you need to get. Get this one and you’ll get yourself a major victory.
As anti-climatic as this will be…. you are going to use helicopters against them. Attack with two flanks for efficiency and focus your energy on wiping out commands as safely as you can. Whenever the enemy has forces around kill them, but the main focus is commands. He can spawn out a lot of them so be wary of that.
Having an FOB will be invaluable as the computer will have a lot of vehicles and tanks and thus you will run out of SACLOS missiles very quickly.
The naval category of the game is 100% free of activation points. It comes with a lot of options and a lot of choices. This guide will look at the naval category and all of the uses of the various units found in it in a bid to win the sea battle.
1. Weapon Terminology
Any weapon that reads [SHIP] on it is used to destroy ships.
Most of these are ASMs or Anti-Ship Missiles. They can also ONLY be fired at ships.
To counter these you have Anti-missile defense which can be seen in the [DEF] tag… and most often these are area of effect weapons or [AOE]
Not all ships will have both of these… or either of these. When choosing ships for naval combat remember that you will need to have one or both of these on each ship to be effective in ship to ship combat.
There are a few ships that have mortars, howitzers, and rocket artillery. These can be used in ship to ship combat… but will not fit into a proper defense.
2. How Ships Work
One ship fires a missile. It will fly over the top of the ocean and it will move towards the target. The other ship will deploy one anti-missile volley that can only intercept one missile at a time. If there are none available then the missile can either hit or miss.
So if there are three ships firing and three ships defending, it will be impossible to get a hit because the number of defending systems is equal to the number of offending ships.
This means numbers of ASMs firing at once matters. If you can fire more than what they have at once, you will deal damage.
Ships without anti-missile systems need to stay close to the fleet for protection. Stray ships without this kind of protection can easily be destroyed by an anti-ship missile.
3. Re-supplying Your Ships
Each side will gain access to one supply ship, which I highly recommend putting in every single deck you make. It costs a little over 100 points and supplies a lot of resources.
On all supply vehicles are three buttons you can push. These are On and Off buttons. For your ships you will not worry too much about fuel unless one ship is completely out of fuel. You can save supplies by simply turning off the re-fuel button. This will allow you to get more missiles and repairs out of every single supply ship.
Supply ships are also highly explosive. They should not be in the middle of your ships and should sit a decent range from what they’re re-supplying. Otherwise, you can lose a lot of hit points if the vessel is to be destroyed by artillery or an ASM.
4. Helos and Airplanes
Ships are very expensive. The Oliver Hazard Perry is a manageable price if you are looking for more anti-missile defense. For a lower cost Bluefore can get the Baek-Ku and Redfore can get Komar very cheaply to add to the naval fleet.
The goal is to increase the number of ASMs and Anti-missile defense systems that you have on your side.
Helicopters are going to be insanely cheap and have a little over 1000 m of range on ships. This makes it so you have a unit that can fire on the enemy without being able to fire back. Enough helicopters can wipe out a ship in one volley.
All helicopters can be re-supplied with the naval supply ship on an island. If you press the land command they will land wherever is the closest possible location to land.
The downside to helicopters is that they ONLY have anti-ship weapons. On a map in which you are able to get naval superiority these helicopters will stop being useful to you once you have won a major battle.
The other air unit is sea planes. They tend to be a little more versatile and more often than not are multi-role fighters…. meaning they can do anything.
Most planes will come with an auto-cannon for strafing runs on ground vehicles or ships, ASMs and some infrared missiles for challenging other planes. Remember though infrareds are very close range so these will not be used in air superiority roles.
5. The Tactic
When engaging in sea battles make sure to stack all of your ASMs to fire in close succession.
You should only fire a few volleys yourself and move back once all of your anti-ship missiles have been used up. Rinse and repeat this same tactic ad infinitum. As you remove more and more of the enemy’s ships they will slowly retreat back to safer flanking areas.
Aiming down supply ships should be your key priority. They are expensive and they are necessary for surviving these sorts of pressure tactics.